
How to Create REST API with ASP.NET Core and Entity Framework + MySQL
August 14, 2021 -ASP.NET Core has gained traction throughout the years, and it has become #1 most loved web framework according to the GitHub developer survey 2020. One of the things you can make with ASP.NET Core is a REST API, along with other things like MVC web app, server rendered view with Razor template--similar to Java's JSP, Thymeleaf, or PHP's Blade template engine--and others.
In this guide, we are going to create an company management system in the form of REST API with ASP.NET Core, Entity Framework, and MySQL database (provided in XAMPP). We'll be using the Dotnet CLI because of its availability in both Linux and Windows platform, in contrast to Visual Studio IDE which is only available in Windows.
Prerequisites
- Dotnet CLI with .NET 5.0 SDK
Install the dotnet CLI for the specific platform that you use (Windows/Linux/MacOS) provided with the link above.
Verify that the Dotnet CLI is already installed by entering this command on Windows (CMD) or Terminal (Linux):
dotnet
Install the dotnet ef command with the cli tool which has been installed. Typically looks like this
dotnet tool install --global dotnet-ef
Note that you might want to add the installed dotnet-ef to your system's PATH. In Linux, typically the path is ~/.dotnet/tools.
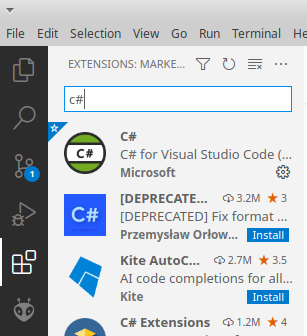
Install Visual Studio Code and search for the C# plugin in the extensions marketplace.
Install XAMPP for the specific platform that you use (Windows/Linux/MacOS) provided with the link above.
In Linux, to start XAMPP you need to run this command if you provide default installation path:
sudo /opt/lampp/lampp start
In Windows, you can start the XAMPP control panel and activate MySQL and Apache.
Once XAMPP has finished starting, to enter the phpmyadmin database management system open up your web browser and go to:
http://localhost/phpmyadmin
You can try creating databases there.
Or if you want to access MySQL through shell, do this command:
- Windows
cd c:\xampp\mysql\bin
mysql.exe -u root --password
- Linux
sudo /opt/lampp/bin/mysql -u root
Creating the project
To create a new ASP.NET Core project, you can follow the instructions below which creates new project with the webapi template. To create a project with another template, visit here to show the available templates for dotnet new.
dotnet new webapi -o companymanagement
cd companymanagement
Installing Dependencies
An empty ASP.NET Core webapi project does not include the Entity Framework Core and MySQL driver by default, but we need it in order to complete this guide. To install it, run these commands:
Source
dotnet add package MySql.EntityFrameworkCore --version 5.0.0+m8.0.23
dotnet add package Microsoft.EntityFrameworkCore.Tools
Running the Project
To run the project, enter the command below in terminal/cmd. But this will do nothing because we haven't added anything yet in our project.
dotnet run
However you can view the example provided by the webapi template, in https://localhost:5001/swagger. Your browser will throw a warning because of unsafe HTTPS connection, but just ignore the warning and just proceed, it's safe.
Creating Models
An Entity Framework model is a representation of a database table.
You only need to define C# classes and add and some attributes in order for Entity Framework to automatically map these classes to MySQL tables, so you don't have to write SQL by hand.
Create a file called Model.cs and add the code below into there.
// Model.cs

using System.ComponentModel.DataAnnotations.Schema;

namespace companymanagement
{
    public class Company : BaseModel
    {
        public string Name { get; set; }
    }

    public class Employee : BaseModel
    {
        public string Name { get; set; }
        public string CompanyID { get; set; }
    }

    public class BaseModel
    {
        [DatabaseGenerated(DatabaseGeneratedOption.Identity)]
        public long ID { get; set; }
    }
}
In order for Entity Framework to be able to map the classes to a database, you need to add a context class which extends DbContext. Here you also must provide the details for connecting to your MySQL database. For XAMPP, put this detail in UseMySQL function:
server=localhost;database=companymanagement;user=root;password=
Put this
- inside
namespace companymanagement - and below
public class BaseModel - and also add
using Microsoft.EntityFrameworkCore
// Model.cs

using System.ComponentModel.DataAnnotations.Schema;

using Microsoft.EntityFrameworkCore; // +++ Add this line

namespace companymanagement
{
    // public class BaseModel
    ...

    // Context
    public class AppContext : DbContext
    {
        public DbSet<Company> Company { get; set; }
        public DbSet<Employee> Employee { get; set; }

        protected override void OnConfiguring(DbContextOptionsBuilder optionsBuilder)
        {
            optionsBuilder.UseMySQL("server=localhost;database=companymanagement;user=root;password=");
        }
    }
}
Migrating models
In order for Entity Framework to actually map your model into your database, you'll have to migrate it with a CLI command.
Add the migration script in Program.cs in your program startup file:
// Program.cs

using Microsoft.EntityFrameworkCore; // +++ Add this line

...

public static void Main(string[] args)
{
    // Migrate at the start of the program
    using (var context = new AppContext())
    {
        context.Database.Migrate();
    }

    CreateHostBuilder(args).Build().Run();
}
...
Then in project root, run:
# you can change 'mymigration' to anything you like
dotnet ef migrations add mymigration
Ensure the table companymanagement exists in your database, and then finally run:
dotnet run
The REST server will start. The tables and fields should already be in the database.
Each time your model changes and you want to refresh your tables, you'll have to run:
dotnet ef migrations add <migration_name>
dotnet run
Creating Controllers
Using a controller is one way for you web API to interact with REST clients such as web browser or another back-end service. Here, we create a new file in the Controllers directory called CompanyController.cs.
// Controllers/CompanyController.cs

using Microsoft.AspNetCore.Mvc;
using System.Linq;

namespace companymanagement.Controllers
{
    [ApiController]
    [Route("[controller]")]
    public class CompanyController : ControllerBase
    {
        private readonly AppContext _context;
        public CompanyController()
        {
            _context = new AppContext();
        }

        [HttpGet("/api/Companies")]
        public dynamic All() => _context.Company;

        [HttpGet("/api/Companies/{id}")]
        public dynamic Get(int id) => _context.Company.SingleOrDefault(c => c.ID == id);
    }
}
Run
dotnet run
again, and you can access the list of companies inside the database with your web browser through this URL:
https://localhost:5001/api/Companies
But that returns an empty array, since there are nothing yet inserted in the database. The response will look like this in the web browser:
[]
To create an endpoint for doing test insertion, create another endpoint in the controller that looks like this:
// Controllers/CompanyController.cs

using Microsoft.AspNetCore.Mvc;
using System.Linq;

namespace companymanagement.Controllers
{
    ...

    [ApiController]
    [Route("[controller]")]
    public class CompanyController : ControllerBase
    {
        ...

        [HttpGet("/api/Companies/TestAdd")]
        public dynamic TestAdd()
        {
            var newCompany = new Company
            {
                Name = "New Company"
            };

            _context.Update(newCompany);
            _context.SaveChanges();

            return newCompany;
        }

        ...
    }

    ...
}
Restart the dotnet app, and then open this URL in the browser:
https://localhost:5001/api/Companies/TestAdd
You'll get this response:
{
  "name": "New Company",
  "id": 1
}
To retrieve the saved company instance with the ID 1, open this URL in your web browser:
https://localhost:5001/api/Companies/1
And you'll receive the exact same response as the saved company instance.
Disable HTTPS Redirection
Some services like Microsoft IIS or Azure App Service provides HTTPS out of the box for ASP.NET Core applications.
However, in a server other than Microsoft IIS or Azure App Service which does not have ASP.NET Core as first-class support, you usually have to manage your own HTTPS configuration, such as using Let's Encrypt's Certbot.
To achieve that, you're going to have to disable HTTPS redirection. This enables an ASP.NET Core application to communicate with other back-end services inside a Virtual Private Server, and then route it through Apache or NGINX web server through reverse proxy, and of course enables you to configure HTTPS.
Open up Startup.cs and comment the line which says app.UseHTTPSRedirection().
// Startup.cs

public void Configure(IApplicationBuilder app, IWebHostEnvironment env)
{
    ...

    // app.UseHttpsRedirection();

    ...
}
Restart the server, and you can access the list of companies without HTTPS:
http://localhost:5000/api/Companies
POST Request
Now we are going to make an endpoint in the CompanyController for POST request a.k.a. to save data through JSON format.
Create this endpoint in CompanyController.cs:
// Controllers/CompanyController.cs

using Microsoft.AspNetCore.Mvc;
using System.Linq;

namespace companymanagement.Controllers
{
    ...

    [ApiController]
    [Route("[controller]")]
    public class CompanyController : ControllerBase
    {
        ...

        [HttpPost("/api/Companies")]
        [Consumes("application/json")]
        public dynamic Save(Company company) {
            _context.Update(company);
            _context.SaveChanges();

            return company;
        }

        ...
    }

    ...
}
To execute the POST request, you'll need an HTTP client, for now, let's just use Postman. You can download it here.
Open the app, and then create a new request like this:
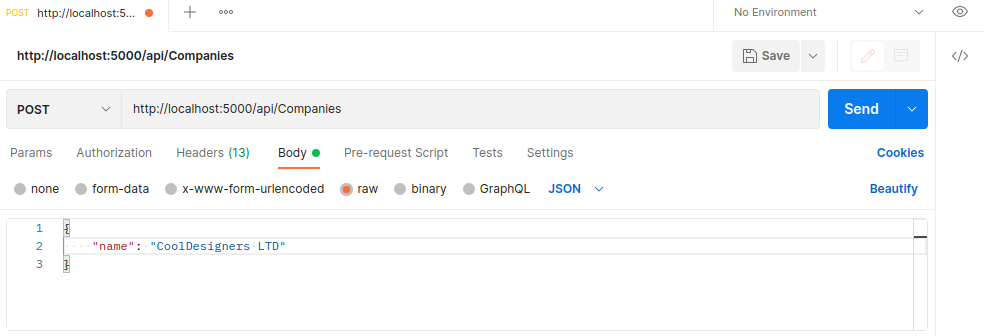
- POST Request
- Points to
http://localhost:5000/api/Companies - Has
rawbody - Pick JSON as format
- Has this as body
{
  "name": "CoolDesigners LTD"
}
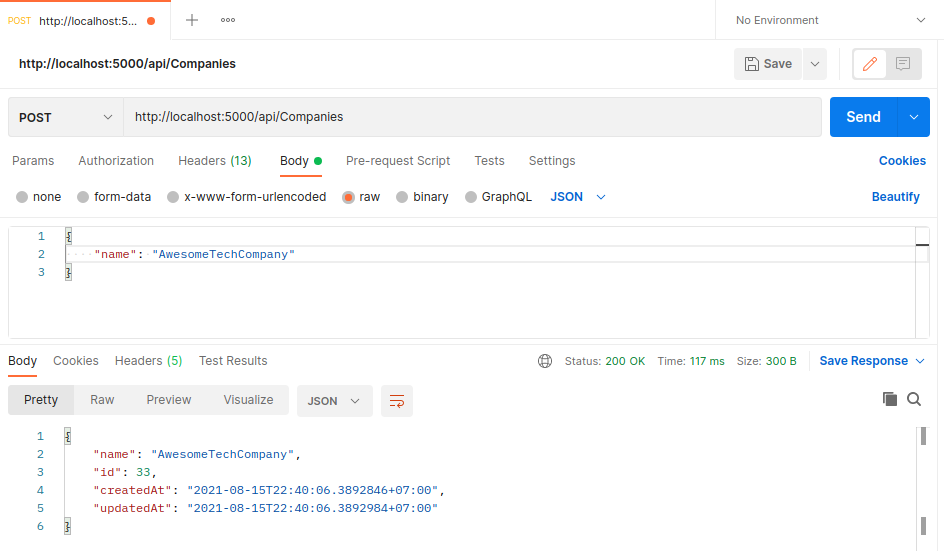
And you are going to get this response:

with the id parameter automatically generated by the database. That's why you don't need to provide the id.
Note that the ID may vary according to how your database generates it.
Database Relationship
So we have 2 tables defined in Model.cs, which are Company and Employee.
How do we connect the tables together? Let's say each employees are affiliated to a company, and cannot be affiliated to more than a company, like the following:
                        │
 Company                │   Employee
────────────────────────┼────────────────────
                        │
 ┌────────────────────┐ │
 │ CoolDesigners LTD  │ │   ┌──────────┐
 └────────────────────┼─┼───► T'Challa │ID:1
 ID:1                 │ │   ┌──────────┤
                      ├─┼───► Adam     │ID:2
                      │ │   ┌──────────┤
                      ├─┼───► David    │ID:3
                      │ │   ┌──────────┤
                      └─┼───► Cecil    │ID:4
                        │   └──────────┘
                        │
                        │
 ┌────────────────────┐ │
 │ AwesomeTechCompany │ │   ┌───────────┐
 └────────────────────┼─┼───► Shania    │ID:5
 ID:2                 │ │   ┌───────────┤
                      ├─┼───► Rob       │ID:6
                      │ │   ┌───────────┤
                      ├─┼───► Adrian    │ID:7
                      │ │   ┌───────────┤
                      └─┼───► Shodiq    │ID:8
                        │   └───────────┘
                        │
We have 8 employees, and each are affiliated to one company:
- T'Challa: CoolDesigners LTD
- Adam: CoolDesigners LTD
- David: CoolDesigners LTD
- Cecil: CoolDesigners LTD
- Shania: AwesomeTechCompany
- Rob: AwesomeTechCompany
- Adrian: AwesomeTechCompany
- Shodiq: AwesomeTechCompany
If we were to model each employee to a JSON object, assuming that the companies already exists in the database, it'll be like:
Companies
-
{ "id": 1, "name": "CoolDesigners LTD" } -
{ "id": 2, "name": "AwesomeTechCompany" }
Employees
{ "id": 1, "name": "T'Challa", "companyID": 1 }{ "id": 2, "name": "Adam", "companyID": 1 }{ "id": 3, "name": "David", "companyID": 1 }{ "id": 4, "name": "Cecil", "companyID": 1 }{ "id": 5, "name": "Shania", "companyID": 2 }{ "id": 6, "name": "Rob", "companyID": 2 }{ "id": 7, "name": "Adrian", "companyID": 2 }{ "id": 8, "name": "Shodiq", "companyID": 2 }
You may notice that the Employee model already has the CompanyID property, but we have not defined the Company object in which the employee belongs to. To create it, we have to add:
// Model.cs

...

 public class Employee : BaseModel
    {
        public string Name { get; set; }

#nullable enable                                // +++ Add this
        [ForeignKey("CompanyID")]               // +++ Add this
        public Company? Company { get; set; }   // +++ Add this
        public long? CompanyID { get; set; }

    }

...
The #nullable enable directive ensures that the created employee does not have to be affiliated to a company.
You might also get a warning in the DbSet<Company> and DbSet<Employee> that it should be nullable. If you get the warning, just add a question mark in the type (indicating that it's nullable):
public class AppContext : DbContext
    {
        public DbSet<Company>? Company { get; set; }    // +++ Add nullable
        public DbSet<Employee>? Employee { get; set; }  // +++ Add nullable

        ...
    }
Finally, to fetch the employees data with the affiliated companies, we need to tell the controller to also fetch the Company property. We haven't added the Employee controller yet, so let's make it.
// Controllers/EmployeeController.cs

using Microsoft.AspNetCore.Mvc;
using System.Linq;
using Microsoft.EntityFrameworkCore;

namespace companymanagement.Controllers
{
    [ApiController]
    [Route("[controller]")]
    public class EmployeeController : ControllerBase
    {
        private readonly AppContext _context;
        public EmployeeController()
        {
            _context = new AppContext();
        }

        [HttpGet("/api/Employees")]
        public dynamic All() => _context.Employee.Include(e => e.Company);

        [HttpGet("/api/Employees/{id}")]
        public dynamic Get(long id) =>
            _context
                .Employee
                .Where(e => e.ID == id)
                .Include(e => e.Company)
                .FirstOrDefault();

        [HttpGet("/api/Employees/TestAdd")]
        public dynamic TestAdd()
        {
            var newEmployee = new Employee
            {
                Name = "Test Employee",
                CompanyID = 1
            };

            _context.Update(newEmployee);
            _context.SaveChanges();

            return newEmployee;
        }

        [HttpPost("/api/Employees")]
        [Consumes("application/json")]
        public dynamic Save(Employee employee) {
            _context.Update(employee);
            _context.SaveChanges();

            return employee;
        }

    }
}
Notice that we need to call
.Include(e => e.Company)
in order for the Company property to be added in the JSON response.
To view all employees with the affiliated companies, just access this URL in your web browser:
http://localhost:5000/api/Employees
Created and Updated Timestamp
Last but not least, this is a common pattern found in the app for auditing data, which are created and updated column, which enables the program runtime to automatically add fields like CreatedAt and UpdatedAt, to indicate when the data was created and the last time the data was updated.
To create the CreatedAt and UpdatedAt fields, you can add a constructor to BaseModel with the following body:
// Model.cs

public class BaseModel
{
    ...

    [DatabaseGenerated(DatabaseGeneratedOption.Identity)]
    public long ID { get; set; }
    public DateTimeOffset? CreatedAt { get; set; }  // +++ Add this line
    public DateTimeOffset? UpdatedAt { get; set; }  // +++ Add this line

    public BaseModel()  // +++ Add this line
    {   // +++ Add this line
        if (CreatedAt == null) { CreatedAt = DateTimeOffset.Now; }  // +++ Add this line
        UpdatedAt = DateTimeOffset.Now; // +++ Add this line
    }   // +++ Add this line

    ...
}
And each time you save an object to the database, you are going to have createdAt and updatedAt properties automatically created for you.
Closing
We have covered so much in this article. To sum it all up, we have:
- Installed dotnet CLI, its tools, and setting up MySQL database with XAMPP
- Created a dotnet
webapiproject - Installed MySQL and EF Core dependencies
- Created models and controllers, and how to migrate the models to database
- Created relationships between companies and employees (one-to-many relationship)
- Saved company and employee JSON data into the database
- Added the
CreatedAtandUpdatedAttimestamp
.NET Core is more than this. A few things you can explore might be:
- Securing your web API with JWT or OAuth2 (Google sign-in, Facebook sign-in, etc.), making use of middleware
- Consuming the company and employee data from web and mobile front-end (CORS, CSRF issues)
- Using Razor (.cshtml) template for server-side rendering and SEO
- Creating DTO (Data Transfer Object) to show companies with Employees through composition, for example:
[
  {
    "company": { "id": 1, "name": "CoolDesigners LTD" },
    "employees": [
      { "id": 1, "name": "T'Challa", "companyID": 1 },
      { "id": 2, "name": "Adam", "companyID": 1 },
      { "id": 3, "name": "David", "companyID": 1 },
      { "id": 4, "name": "Cecil", "companyID": 1 }
    ]
  },
  {
    "company": { "id": 2, "name": "AwesomeTechCompany" },
    "employees": [
      { "id": 5, "name": "Shania", "companyID": 2 },
      { "id": 6, "name": "Rob", "companyID": 2 },
      { "id": 7, "name": "Adrian", "companyID": 2 },
      { "id": 8, "name": "Shodiq", "companyID": 2 }
    ]
  }
]
- Complex queries using LINQ (dynamic, customizable, & multiple where, and, or, like, etc.)
That's it for now. Happy hacking!